
Whether you’re dealing with security concerns, outdated design, or simply looking for a fresh start, this guide will walk you through the entire process step-by-step and show you how to delete your site permanently. We’ll also discuss potential alternatives to deleting your site and help you decide if it’s the right choice.
Finally, we’ll recommend several useful tools and plugins to help you along the way.
Why would you delete a WordPress website?
There are various reasons one might consider deleting a WordPress website.
Here are some of the most common scenarios:
- Security issues: If your site has been compromised by hackers or malware, deleting it and starting fresh might be the best option to ensure your hosting server is clean.
- Outdated design: Maintaining a site with an outdated design can negatively impact user experience and search engine rankings. Starting anew allows you to implement modern features and a refreshed look.
- Client requests: As a web developer or designer, you may need to delete a site at the client’s request, whether it’s to transition to a new platform or discontinue an online presence.
- Starting fresh: Sometimes, it’s easier to delete a WordPress site completely and begin anew rather than dealing with complicated updates or reorganizations.
- Unused or redundant websites: If you’re managing multiple websites and one of them is no longer needed, deleting it can save resources and prevent unnecessary maintenance tasks.
- Legal or compliance issues: A site may need to be deleted to comply with legal obligations or ensure adherence to specific regulations.
Is deleting the entire site the right choice?
Site deletion is a drastic and permanent action.
Before taking the plunge and deleting your WordPress site permanently, it’s essential to consider the consequences and explore potential alternatives. Here’s why:
- Irreversible action: Deleting a WordPress site permanently means all your posts, media files, and databases will be gone unless you’ve made a complete backup. This action cannot be undone.
- SEO considerations: Your site’s dashboard may indicate a steady flow of traffic from search engines. Deleting the site will remove it from search results and could impact your online presence.
- Alternatives to deletion: Consider archiving the site or putting it in maintenance mode instead of deleting it. Tools like Google Drive or the Internet Archive can preserve your content for future reference.
- Impact on hosting account: If the site is part of a hosting plan that supports multiple websites, deleting it may affect other sites sharing the same account settings or root directory.
Careful planning can help you determine whether deleting the site is truly necessary or if other options like rebranding, redesigning, or temporarily deactivating it would better serve your needs.
Alternatives to site deletion
If you’re hesitant about deleting a WordPress site permanently, there are several alternatives you can explore:
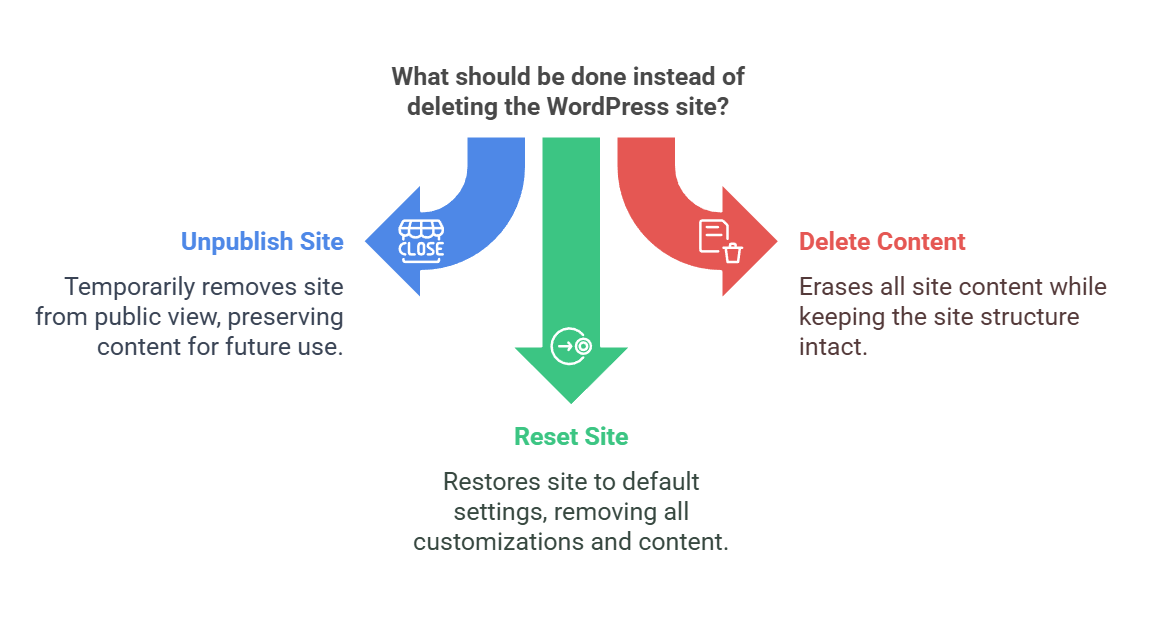
Unpublishing the WordPress website
Unpublishing a WordPress website means temporarily making it inaccessible to visitors while retaining all the content. This option is ideal for sites undergoing redesign or maintenance.
Here’s how to unpublish your WordPress website:
- Set your site to private:
- Log in to your WordPress dashboard.
- Navigate to “Settings” > “Reading.”
- Under “Site Visibility,” select “Private” and save the changes.
- Use maintenance mode plugins:
- Install a maintenance mode plugin like “SeedProd” or “WP Maintenance Mode.”
- Activate the plugin and customize the maintenance mode page.
- Enable maintenance mode to make the site temporarily inaccessible.
- Disable indexing by search engines:
- Navigate to “Settings” > “Reading.”
- Check the box that says “Discourage search engines from indexing this site” and save the changes.
Deleting the contents of a WordPress website
Deleting the contents of a WordPress website involves removing all posts, pages, media files, and plugins while retaining the basic framework of the site. This option is useful for starting fresh without having to rebuild the site entirely.
Here’s how to do it:
- Log in to your WordPress dashboard:
- Access the admin panel using your credentials.
- Delete posts and pages:
- Go to “Posts” or “Pages.”
- Select all items, move them to Trash, and then permanently delete them from Trash.
- Remove media files:
- Navigate to “Media.”
- Bulk-select all files and delete them.
- Deactivate and delete plugins:
- Go to “Plugins” > “Installed Plugins.”
- Deactivate and delete all unnecessary plugins.
- Clear customizations:
- Reset your theme settings to default or switch to a new theme.
WordPress site reset
A WordPress site reset is a process that restores the site to its default state, removing all customizations, content, and settings. It’s a clean slate for rebuilding the site from scratch.
Here’s how to perform a site reset:
- Install a reset plugin:
- Search for plugins like “WP Reset” or “Advanced WordPress Reset.”
- Install and activate the plugin.
- Backup your data:
- Create a complete backup of your site’s files and database using a plugin or FTP client.
- Perform the reset:
- Access the plugin’s settings from the dashboard.
- Select the reset option and confirm your action by typing the confirmation phrase.
- Reconfigure settings:
- After the reset, log in to your WordPress dashboard and configure basic settings like permalinks, themes, and plugins
Whatever you choose, be sure to first back up the site before you permanently delete WordPress site, some part of it, do a reset or unpublish it.
How to delete a WordPress site in several steps
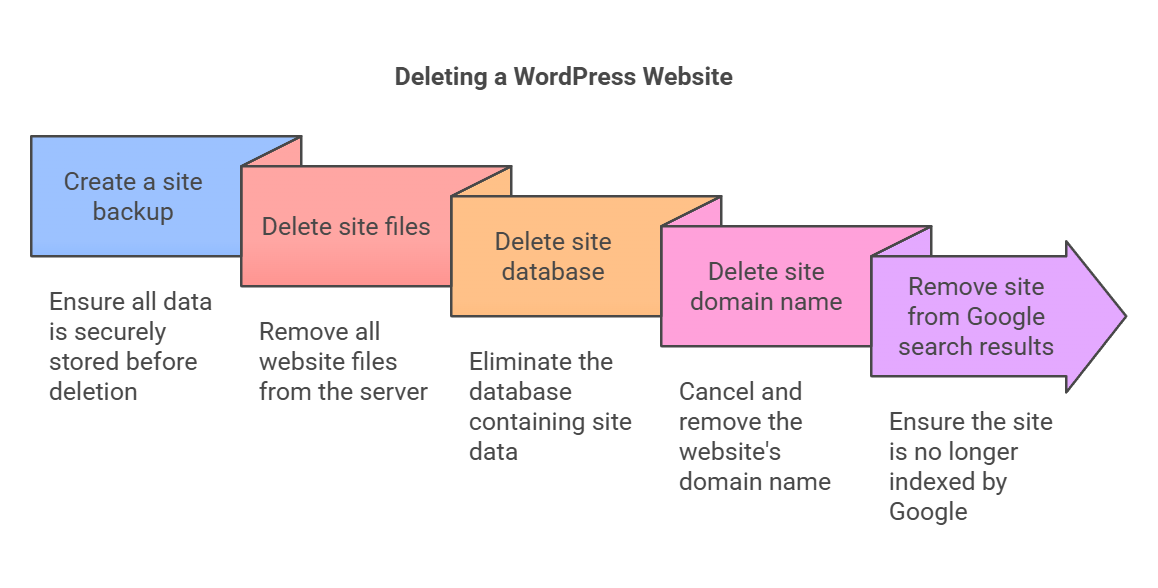
If you do decide to delete your site from WordPress, you have several options to do so — but always start with a site backup.
Step 1: Backup your WordPress website to prepare for the deletion process
Even if you’re 100% sure you want to delete WordPress site permanently, it pays off to have a site backup stashed somewhere safe.
A backup ensures that you have a safety net in case you change your mind, encounter technical issues, or want to recover any essential data from the site later.
Without a backup, all your data—including posts, media files, and databases—will be permanently lost during the deletion process.
Backing up your site is also crucial if you decide to rebuild a new website later. With a backup, you can reuse old content, streamline the setup of a new site, and avoid losing valuable time and effort spent on your previous work.
Additionally, web host providers or web developers may require backups for troubleshooting or migration purposes.
Fortunately, creating a backup is simple and can be done using WordPress plugins or manual methods.
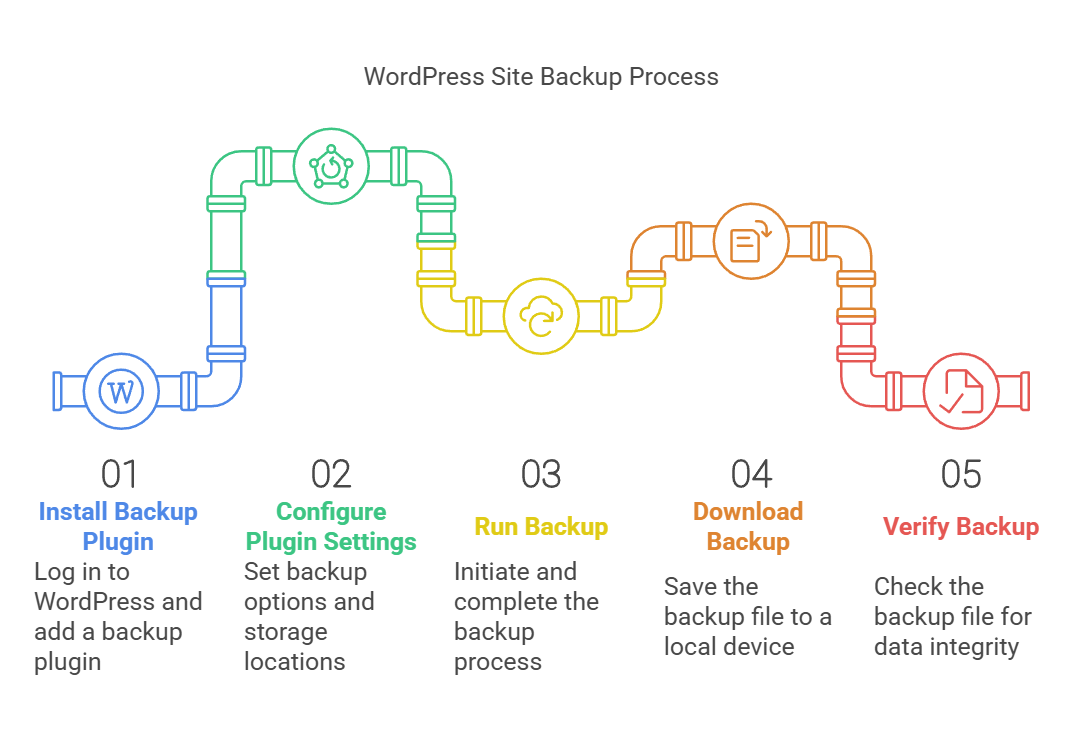
Here’s a step-by-step guide to back up your WordPress site with ease:
- Install a backup plugin:
- Log in to your WordPress dashboard.
- Navigate to “Plugins” > “Add New.”
- Search for popular backup plugins like “UpdraftPlus” or “All-in-One WP Migration.”
- Install and activate the plugin of your choice.
- Configure the plugin settings:
- Access the plugin settings from your dashboard.
- Choose the backup options, including what to back up (e.g., files, database) and where to store it (e.g., Google Drive, Dropbox, or your local device).
- Run a backup:
- Initiate the backup process directly from the plugin interface.
- Wait for the backup to complete. The time required depends on the size of your site.
- Download and store the backup:
- Once the backup is complete, download the file to your local device for safekeeping.
- Optionally, store additional copies in secure cloud storage or external drives.
- Verify the backup:
- Open the backup file to ensure that it contains all the necessary data.
- Confirm that the file is accessible and free of errors.
Step 2: Delete WordPress site files
Removing all the files files ensures that no trace of your website remains on your hosting server, reducing the risk of unauthorized access, leftover data, or conflicts with future projects on the same server.
Properly deleting your WordPress site files also helps free up storage space and ensures your hosting account remains organized.
There are two ways to delete WordPress website files:
- With FTP (we’ll use Cyberduck as a FTP client for example purposes)
- With cPanel server and site management platform (with GoDaddy as a web host example)
Deleting files via FTP (File Transfer Protocol)
FTP clients like Cyberduck make it easy to access your hosting server’s files and delete them.

Follow these steps to delete WordPress site files using Cyberduck:
- Install and configure Cyberduck:
- Download and install Cyberduck from its official website.
- Open the application and click “Open Connection.”
- Enter your hosting server’s FTP credentials (usually provided by your hosting provider) and click “Connect.”
- Navigate to the root directory:
- Once connected, locate your WordPress installation folder. This is usually in the public_html or www directory.
- Select and delete WordPress files:
- Highlight all files and folders related to your WordPress site, including wp-content, wp-admin, and wp-includes directories.
- Right-click and select “Delete” to remove the files.
- Verify deletion:
- Refresh the directory to ensure all files have been removed.
- Disconnect from the FTP client once the process is complete.
Deleting files via cPanel

Here’s how to delete your files using GoDaddy’s cPanel:
- Log in to GoDaddy’s cPanel:
- Access your GoDaddy account and navigate to your hosting dashboard.
- Click on “cPanel Admin” to enter the cPanel interface.
- Access the File Manager:
- Locate and click on the “File Manager” icon under the “Files” section.
- Open the public_html or appropriate directory containing your WordPress site files.
- Select and delete files:
- Highlight all files and folders associated with your WordPress site.
- Click the “Delete” button at the top menu.
- Confirm the deletion when prompted.
- Clear the trash:
- Open the “Trash” folder in File Manager.
- Permanently delete the files to ensure they are completely removed from your server.
Step 3: Delete the WordPress site database
When you delete a WordPress site database, you’re removing the core structure that powers your website.
Without this step, sensitive information such as login credentials, user data, and previous configurations could remain accessible to unauthorized users.
Additionally, clearing the database helps free up server space and ensures that no residual data interferes with new projects hosted on the same server.
Below, we’ll show you how to delete the database via phpMyAdmin and via MySQL Databases tool
Deleting the database via MySQL Databases tool

The MySQL Databases tool in cPanel provides is a straightforward way of managing and deleting databases.
Follow these steps:
- Access the MySQL Databases tool:
- Log in to your cPanel and navigate to the “Databases” section.
- Click on “MySQL Databases.”
- Identify the database:
- Locate the database associated with your WordPress site in the list of databases.
- Delete WordPress database:
- Click on the “Delete” button next to the database name.
- Confirm the deletion when prompted.
Deleting the database via phpMyAdmin
phpMyAdmin is a popular tool included with most hosting accounts that allows users to manage and delete databases.
Here’s how to delete your WordPress database using phpMyAdmin:
- Log in to cPanel:
- Access your hosting provider’s cPanel (e.g., GoDaddy).
- Navigate to the “Databases” section and click on “phpMyAdmin.”
- Select the database:
- In phpMyAdmin, locate the database associated with your WordPress site. The database name often matches the name specified in your wp-config.php file.
- Backup the database:
- Before deleting, consider creating a backup of the database by clicking on the “Export” tab and downloading the file.
- Delete the database:
- Click on the database name in the left-hand panel to view its tables.
- Select all tables by clicking on “Check All” at the bottom of the table list.
- From the drop-down menu, select “Drop” to permanently delete the tables.
- Remove the database:
- Return to the “Databases” section in cPanel.
- Locate the database name and click “Delete Database” to remove it completely.
Step 4: How to delete WordPress site domain name
Removing the domain name involves deleting its DNS records and unregistering it, effectively ensuring that the domain no longer directs to your old WordPress site or hosting account.;
You should also delete site domain to:
- Prevent unauthorized use: If you no longer need the domain, deleting it ensures that no one else can use it to replicate your content or misuse it.
- Stop unnecessary expenses: If the domain is associated with hosting plans or subscriptions, removing it eliminates ongoing costs.
- Ensure complete removal: Deleting the domain name guarantees your site is no longer accessible via its previous URL, ensuring full site deletion.
How to delete a domain name via GoDaddy’s cPanel
- Log in to your GoDaddy account:
- Access your GoDaddy dashboard and navigate to your domain management section.
- Access your domains:
- Select the domain you want to delete and click “Manage DNS.”
- Delete DNS records:
- Remove all DNS records associated with the domain, including A records, CNAME records, and MX records.
- Unregister the domain:
- Contact GoDaddy support or navigate to the “Domains” section and use the “Delete” or “Unregister” option.
- Confirm deletion:
- Follow the verification steps provided by GoDaddy to confirm and finalize the domain deletion.
Step 5: Remove your site from Google’s search results
Even after deleting your WordPress site and its domain name, remnants of the site might still appear in Google’s search results.
Removing your site from Google ensures that visitors cannot access cached pages or previously indexed content and helps you:
- Maintain privacy: Prevent sensitive or outdated information from being visible to search engines.
- Avoid misleading users: Ensure visitors don’t access broken links or cached versions of your site.
- Comply with legal requirements: Some regulations may require the removal of specific information from search engine results.
Here’s how to stop your deleted website from appearing in Google search results:
- Log in to Google Search Console and select the property for your deleted site.
- Navigate to “Removals” in the left-hand menu, click on “New Request” and enter the URL of the page or site you want to remove.
- Select “Remove URL” or “Temporarily Remove URL” and confirm your action.
- Go to “Sitemaps” in Search Console and delete the sitemap file associated with your site to prevent further indexing.
- Edit your site’s robots.txt file to disallow all user agents from crawling the site; for example, add the following lines to your robots.txt file:
User-agent: * Disallow: / - Request cache removal; if specific pages still appear in search results, use the URL Inspection Tool in the Search Console to request cache removal for those pages.
And you’re done! You’ve now successfully deleted your WordPress website.
In case you change your mind, you can always use your site backup.
Note that if you don’t go back to restore it within 30 days, you delete your site permanently.