
Caching is a vital part of maintaining a fast and efficient WordPress site, but it can sometimes cause outdated or broken content to be displayed.
Knowing how to clear cache in WordPress ensures that visitors always see the latest version of your site.
Whether you’re dealing with browser cache, WordPress caching plugins, or server-side caching, clearing your cache can resolve a variety of issues, from formatting problems to outdated images. Clearing the browser’s cache is particularly important to ensure that recent changes made to a website are visible on the front end.
In this guide, you’ll learn the different methods to clear your WordPress cache, how to manage cache files, and how to address server cache and browser cache.
We’ll also provide practical tips on cache management to improve your WordPress website’s performance while reducing server load and optimizing your user experience.
Let’s dive in and explore the best techniques for clearing your cache to keep your WordPress website running smoothly.
Understanding WordPress cache
WordPress cache refers to the temporary storage of data that helps speed up the loading process for your WordPress site.
When a user visits your site, the system generates pages dynamically by fetching data from the database, processing PHP scripts, and loading static website content like images, CSS files, and JavaScript files.
This process, while essential, can be resource-intensive, especially on high-traffic sites.
The purpose of caching is to reduce the time it takes to display a web page by storing a cached version of your content.
According to Google, 53% of mobile users abandon a site that takes longer than 3 seconds to load.
This cached content eliminates the need to regenerate the same data repeatedly, resulting in faster loading times, reduced server load, and an overall better user experience.
Caching also optimizes the performance of your WordPress website by allowing users to access pages and resources more quickly eliminating render blocking resources, which is crucial for retaining visitors and improving search engine rankings.
How WordPress cache is helpful
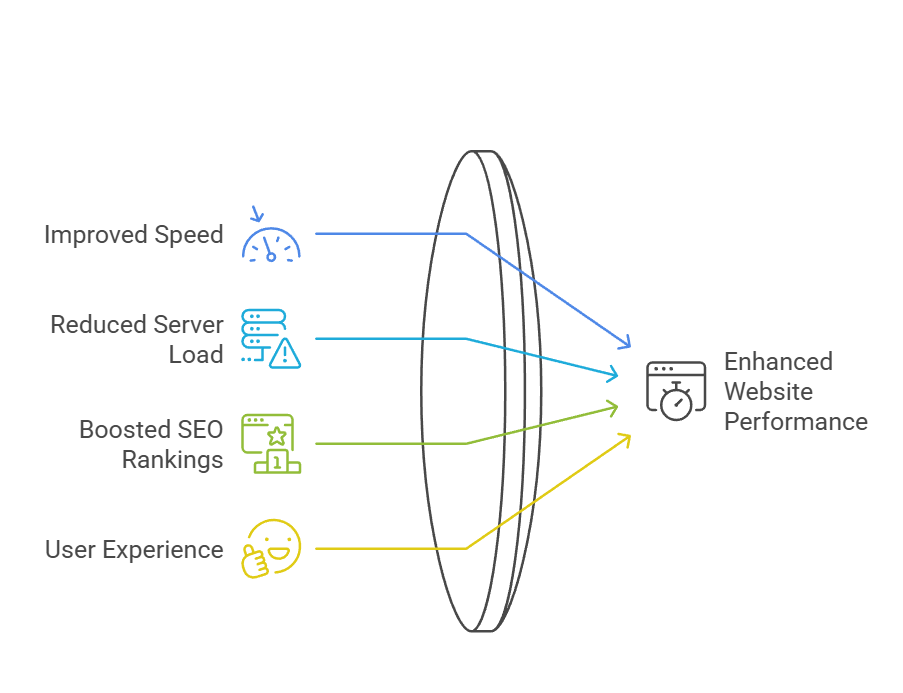
Caching plays a large role in enhancing website performance.
Improving speed and performance
By serving a cached version of your site, caching significantly reduces page load times, ensuring users experience faster browsing.
For example, instead of dynamically generating a page every time a user visits, a cached version delivers the same content in milliseconds, leading to a smoother and more seamless user experience.
This is particularly crucial for resource-intensive websites or ecommerce platforms with large catalogs, where speed can directly impact sales and engagement.
Whether you are using WordPress or any of the WordPress alternatives, removing cache is crucial for your website’s performance.
Reducing server load
Caching minimizes the requests sent to the hosting server, allowing your site to handle higher traffic without performance issues.
During peak traffic periods like a flash sale or major event, caching can serve pre-stored content to thousands of users simultaneously without overwhelming the server.
This improves stability and reduces hosting costs since fewer resources are consumed.
Boosting SEO rankings
Faster loading times contribute to better rankings in search engines, as site speed is a crucial factor for SEO.
Search engines like Google prioritize websites that offer a quick and efficient browsing experience, as it aligns with their goal of improving user satisfaction. A well-cached website can achieve lower bounce rates and higher dwell times, signaling to search engines that the content is relevant and valuable.
Enhancing user experience
Visitors are more likely to stay and interact with a site that loads quickly and efficiently.
A fast website can lead to higher engagement metrics such as page views, time spent on site, and conversions. For example, a blog with cached pages ensures readers can navigate between articles without delay, while an online store with cached product pages makes the shopping experience more enjoyable.
Delays of even a few seconds can lead to user frustration and abandonment, which caching effectively mitigates.
Three types of WordPress cache
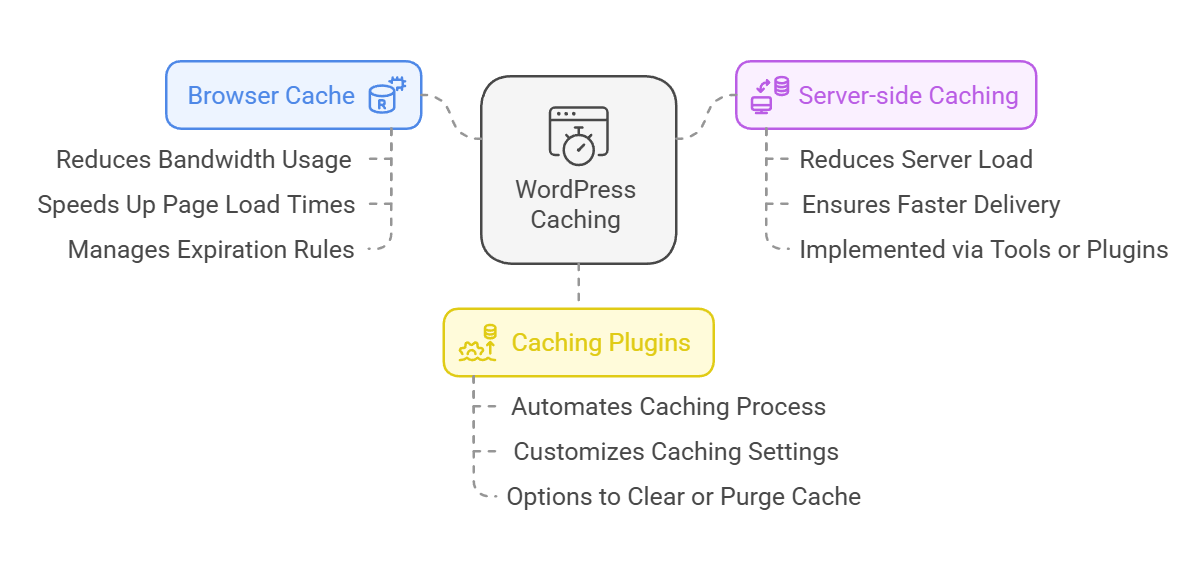
Understanding these types of caching enables you to choose the best methods and tools to enhance your WordPress website cache management, and create a faster and more efficient site for your visitors:
1. Browser cache
Browser cache refers to the temporary storage of site data on a user’s local device.
When a user visits your WordPress site, their web browser saves certain files, such as images, CSS files, and JavaScript files, in local storage. This allows the browser to load these resources more quickly on subsequent visits by reusing the cached content instead of downloading it again from the server.
Key attributes:
- Reduces bandwidth usage by storing static resources locally.
- Speeds up page load times for returning visitors.
- Often managed by configuring expiration rules in the site’s HTTP headers.
2. Server-side caching
Server-side caching stores cached data directly on the hosting server. This type of caching includes mechanisms like object caching, page cache, and database caching, which are handled by the server to reduce the time it takes to process requests and generate dynamic content.
Key attributes:
- Reduces the processing load on the server by storing precompiled resources.
- Ensures faster delivery of frequently accessed pages.
- Often implemented through tools provided by the hosting provider or WordPress plugins like WP Super Cache or W3 Total Cache.
3. Caching plugins
A WordPress caching plugin is a user-friendly tool that allows site owners to implement caching without extensive technical knowledge.
These plugins, such as WP Rocket, WP Super Cache, and W3 Total Cache, offer a wide range of cache management features to optimize your site’s performance. Cache plugins are crucial for improving website speed and performance.
Key attributes:
- Automates the caching process with easy-to-use interfaces.
- Allows customization of caching settings, including page cache, object caching, and database optimization.
- Includes options to clear the cache, purge the cache, or delete specific cached files when updates are made. It is important to use options such as ‘Delete Cached Pages’ and ‘Delete Cache’ to clear stored files effectively.
Why should you clear the WordPress cache even if it’s useful?
While caching is immensely beneficial for improving the speed and performance of your WordPress site, there are situations where clearing the cache becomes necessary.
Keeping your cache fresh is essential for maintaining a high-performance WordPress site.
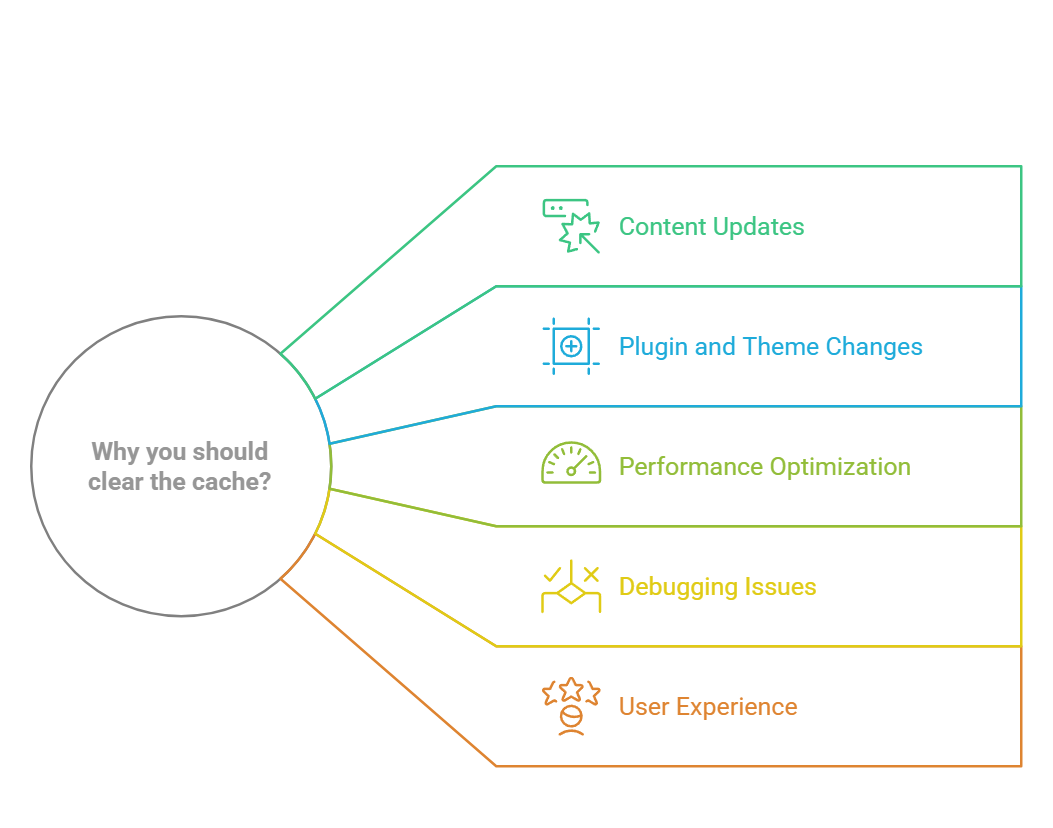
Cached data can sometimes lead to issues, especially when updates or changes are made to your website. Sometimes even plugins are adding unwanted chache to your website, like Yoast SEO cache.
One common issue is when updates to content, such as new blog posts, images, or design changes, fail to appear because the cached version of the site is still being served.
Clearing the cache ensures that visitors see the most recent updates and changes on your WordPress website. This step is particularly crucial after major updates or design overhauls to avoid confusion among your users.
Clearing the cache also helps resolve technical problems like login issues or a sluggish web browser cache.
A stored cache can occasionally conflict with new scripts or data, causing features to malfunction. By removing old cached files, you allow the browser and server to fetch the most up-to-date resources.
Another significant advantage of clearing the cache is improved site responsiveness. Refreshing the cache can improve response times by up to 50%, making your site faster and more user-friendly. This, in turn, enhances the overall user experience and boosts your site’s ranking on Google, as speed is a key factor in SEO performance.
It’s a good practice to clear the cache regularly or after every major update to ensure visitors experience your site as intended.
How to clear WordPress cache in browser
Clearing the browser cache is one of the simplest yet most effective ways to ensure your visitors see the latest updates on your WordPress site.
When you clear the browser cache, you remove outdated or corrupted cached data stored on your local device, such as CSS files, images, and JavaScript files. This allows your browser to fetch a fresh version of the site from the server, resolving common issues like loading errors and incorrect formatting.
Clearing the browser cache can address several common problems, including:
- Loading issues: Outdated cache files can cause incomplete or distorted page loading.
- Formatting problems: Changes to your WordPress website, such as design updates, might not display correctly until the cache is refreshed.
- Ensuring up-to-date content: Removing cached files allows your browser to fetch the latest version of the site.
How to clear WP cache manually in different browsers
Google Chrome
- Open Chrome and click the three-dot menu in the top-right corner.
- Navigate to More Tools > Clear Browsing Data.
- Select the Cached Images and Files checkbox.
- Set the time range to All Time for a complete refresh.
- Click Clear Data to delete the cache.
Mozilla Firefox
- Open Firefox and click the menu button (three horizontal lines) in the top-right corner.
- Select Settings > Privacy & Security.
- Under Cookies and Site Data, click Clear Data.
- Check the Cached Web Content box and click Clear.
Microsoft Edge
- Open Edge and click the three-dot menu in the top-right corner.
- Go to Settings > Privacy, Search, and Services.
- Under Clear Browsing Data, click Choose What to Clear.
- Check the Cached Images and Files option.
- Click Clear Now to remove the cache.
Automating browser cache clearing
If you frequently make updates to your WordPress site, consider setting your browser to clear the cache automatically on exit. Most browsers offer this option in their privacy or advanced settings. This ensures you’re always viewing the most recent version of your site without manual intervention.
Clearing your browser cache is a quick and essential step in maintaining the performance and accuracy of your WordPress website. By ensuring your browser fetches the latest resources, you can resolve technical glitches and provide visitors with an optimized browsing experience.
How to flush WordPress cache using a caching plugin
Using caching WordPress (WP) plugins is one of the most efficient and user-friendly ways to manage your WordPress site’s caching system.
These plugins simplify cache management by offering features tailored to users with varying levels of technical expertise: The WordPress dashboard is an integral interface where users can manage various caching solutions and plugins.
- Intuitive interfaces: Most popular WordPress caching plugins, like WP Rocket, W3 Total Cache, WP Fastest Cache, or LiteSpeed Cache, feature user-friendly dashboards with straightforward controls. These interfaces often include simple buttons labeled “Clear Cache” or “Purge All” that allow users to clear their cache with a single click. Beginners can follow guided tutorials or on-screen prompts without needing advanced technical knowledge.
- Automation options: Many caching plugins allow users to set up automatic cache clearing schedules. For instance, you can configure the plugin to purge the cache whenever you update your website’s content, such as publishing a new blog post or changing a design element. This ensures that your visitors always see the latest version of your site without requiring manual intervention.
- Comprehensive caching features: Caching plugins don’t just handle basic caching; they often include advanced features like object caching, database optimization, and browser caching. For example, plugins like W3 Total Cache can optimize how data is stored and retrieved, while WP Rocket can preload cached pages to improve performance for first-time visitors. WP Fastest Cache also offers features like easy cache clearing and automated purging upon new content publication. These capabilities streamline the caching process, making your site faster and more efficient.
- Compatibility with themes and plugins: Top-tier caching plugins are designed to integrate seamlessly with most WordPress themes and plugins. This compatibility ensures that clearing the cache doesn’t disrupt other site functionalities. For example, if you’re using an e-commerce plugin like WooCommerce, caching plugins can exclude dynamic pages like shopping carts and checkout pages from being cached to prevent errors.
- Performance monitoring tools: Many caching plugins include built-in performance analysis tools to help users assess how caching affects their site’s speed. Plugins like LiteSpeed Cache provide detailed reports on page load times, cache hit rates, and other metrics, allowing users to fine-tune settings for optimal performance.
- Community support and documentation: Popular caching plugins are supported by extensive documentation, video tutorials, and active user communities. This makes it easy to find solutions to common issues or learn best practices for cache management.
Among the top WordPress caching plugins, WP Super Cache is a popular and user-friendly option, we’ll use it as an example to show you how to clear your WordPress cache using the caching plugin.

First, you need to set up WP Super Cache:
- Log in to your WordPress admin dashboard and navigate to Plugins > Add New.
- Search for WP Super Cache Plugin and click Install Now.
- Once the plugin is installed notification appears; click Activate to enable it on your site.
To configure the plugin settings:
- Go to Settings > WP Super Cache from the plugin dashboard.
- In the plugin settings, select the Caching On option and save your changes to enable caching.
Now, from the plugin dashboard, click the Delete Cache tab/button to remove outdated files. This ensures the cached version of your site is updated with the latest changes.
Here are some WP Super Cache features that can help you with the caching system:
- Manual and automatic cache clearing: You can clear cache manually via the dashboard or set automatic cache expiration rules.
- Static file delivery: Converts dynamic pages into static HTML files, significantly reducing server load and speeding up page load times.
- Compatibility with CDNs: Easily integrates with content delivery networks for faster resource delivery worldwide.
How to clear WordPress cache on servers
Clearing the server cache can often resolve issues with stale data or outdated content being displayed on your WordPress site. Building and optimizing WordPress websites by providing guidance on improving website performance and addressing common issues like cache management is crucial for ensuring your content is displayed correctly.
Depending on your hosting provider and setup, you can clear server cache in several ways, including using hosting dashboards, SSH, or FTP access.
Below, we break down each method to help you effectively manage server-side caching.
Using your hosting provider’s control panel
Most WordPress hosting providers offer built-in tools for managing cache directly from their control panels. Here’s how to do it:
- Log in to your hosting account dashboard and navigate to the caching section. This may be labeled as “Cache Management” or something similar.
- Look for an option to clear cache or purge cache. This is typically a one-click process.
- Once you’ve purged the server cache, refresh your WordPress site to ensure the latest version is displayed.
Some hosting providers, like SiteGround or Bluehost, may automatically clear the cache during specific intervals or after major updates. Check with your hosting support for details if you’re unsure.
Clearing cache manually via SSH
If your hosting provider allows SSH access, you can clear the cache manually by following these steps:
- Access your hosting server using an SSH client like PuTTY or Terminal.
- Navigate to the caching directory where your cache files are stored. The exact path will depend on your hosting configuration. For example:
cd /var/cache/nginx/ - Use a command to delete the cached data. For instance, with Nginx, you can run:
sudo rm -rf * - Restart the caching service or web server to apply changes. For example:
sudo systemctl restart nginx
Clearing cache via FTP
FTP access provides another method for clearing the cache manually. Here’s how:
- Use an FTP client like FileZilla to connect to your hosting server.
- Navigate to the directory where the cached content is stored. This might be within a folder like /wp-content/cache/.
- Delete all files and subdirectories within the cache folder.
- Refresh your site to verify the changes.
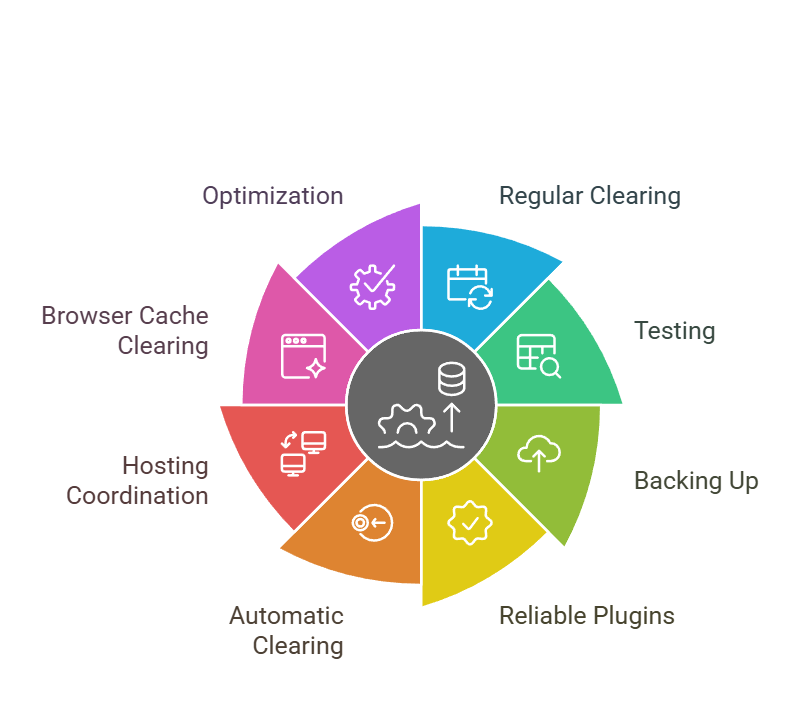
Best practices for clearing cache
Here are some of the best practices for clearing cache:
- Clear cache regularly: Make it a habit to clear your cache periodically, especially after updates to your WordPress site or its content. Regular maintenance ensures visitors see the most current version of your site. For example, if you’ve updated your homepage or added new product pages, clearing the cache ensures these changes are visible to users immediately. Additionally, scheduling cache clearing during low-traffic periods can help avoid disruptions for active visitors.
- Test before and after clearing: Before clearing the cache, check how your site looks and functions, noting any issues like outdated content or missing elements. After clearing the cache, revisit your site to confirm that the latest updates are reflected and that any performance issues have been resolved. Use tools like Google PageSpeed Insights or GTmetrix to measure site speed before and after clearing to ensure the process improves performance as intended.
- Back up your site: Always create a backup of your site before clearing cache manually or via server settings. This step ensures you can restore your site if something goes wrong during the process. For example, some cache-clearing actions may inadvertently disrupt custom scripts or layouts. With a backup in place, you can quickly revert to the previous version of your site without prolonged downtime or data loss.
- Use reliable plugins: Choose from the top WordPress caching plugins like WP Super Cache or WP Rocket to manage and clear cache efficiently. Reliable tools simplify the process and minimize risks.
- Configure automatic cache clearing: For frequent updates, set up automatic cache clearing in your caching plugin’s settings to ensure consistent performance without manual intervention. This is particularly useful for high-traffic websites or e-commerce platforms where products, prices, or promotions change frequently. For example, WooCommerce users can exclude dynamic pages like shopping carts and ensure product pages refresh immediately after updates, maintaining a seamless shopping experience.
- Coordinate with your hosting provider: If your site relies heavily on server-side caching, work with your hosting provider to configure and clear the cache effectively. Some providers offer tools to automate this process.
- Clear browser cache when troubleshooting: When diagnosing issues like outdated content or formatting problems, clear your browser cache to rule out local caching as the culprit.
- Optimize cache settings: Adjust cache expiration times based on your site’s update frequency. For dynamic sites, shorter cache durations may be more appropriate, while static sites can benefit from longer durations.
- Educate team members: Ensure that everyone managing your site understands when and how to clear cache, especially if multiple people are involved in content updates or site maintenance.
- Monitor site performance: Use tools like Google PageSpeed Insights or GTmetrix to track the impact of caching on your site’s performance. This helps you fine-tune your caching strategy for the best results.
Conclusion
Clearing the cache is an essential maintenance task for any WordPress site that lets visitors see the most up-to-date and optimized version of your website.
By removing outdated or corrupted cached data instead of the entire cache, you can resolve common issues such as formatting errors, loading delays, and display inconsistencies.
You can choose to clear cache through a browser, server, or a reliable and popular caching plugin of choice. The various approaches to cache clearing offer flexibility for all levels of users.
Implementing best practices, such as testing changes, backing up your site, and configuring automatic cache clearing, ensures you maintain a smooth and efficient caching system.
By regularly clearing your WordPress cache and leveraging caching tools strategically, you not only enhance the user experience but also improve your website’s performance and search engine rankings.
Streamline your WordPress cache management with StriveCalendar.com!
Keep your website fast, efficient, and up-to-date effortlessly.
Strive Calendar helps you stay organized by scheduling key tasks like clearing your WordPress cache after content updates, and ensuring your visitors always see the latest version of your site. Plan, track, and optimize your caching workflow all in one place.
Try Strive Calendar today and simplify your website management!