
Google Analytics is an essential tool for understanding how your WordPress site performs and how visitors interact with it.
Whether you’re running a personal blog or a business website, adding Google Analytics to your WordPress site allows you to track key metrics like traffic, user engagement, and conversions. By learning how to connect Google Analytics, you can easily integrate it into your site and start collecting valuable data.
Selecting the best method to install Google Analytics based on your experience level is crucial for accurate traffic data collection.
This guide will walk you through the process of integrating Google Analytics into your WordPress site so you can make informed, data-driven decisions to enhance your website’s performance.
Why you need Google Analytics for your WordPress site
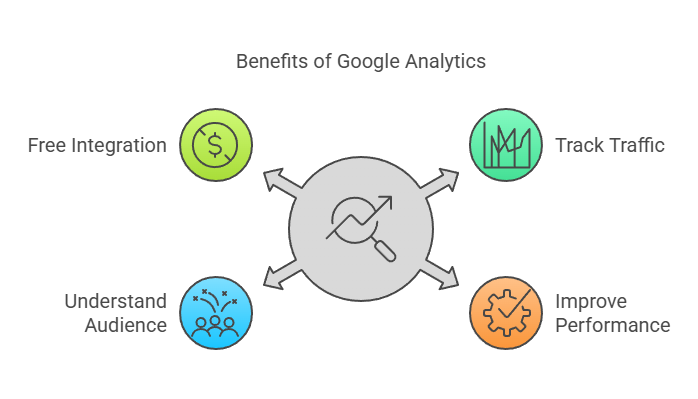
Google Analytics is a powerful tool that helps you understand your website’s traffic, engagement, and conversion rates.
With Google Analytics, you gain access to a wealth of actionable insights that help you improve your WordPress site’s performance, engagement, and overall user experience. Tools and methods specifically designed for WordPress websites, such as Jetpack Stats and Google Analytics, can significantly enhance website performance and offer essential insights into visitor behavior. It’s an indispensable tool for any website owner looking to grow and succeed online.
Here’s why it’s crucial for your WordPress site:
- Track traffic and engagement: Monitor how many people visit your site, where they come from, and which pages they spend the most time on. Google Analytics tracks various aspects of visitor behavior, including the sources of sales revenue, popular pages, and bounce rates. For example, you can identify whether most of your traffic comes from search engines, social media, or referral sites and adjust your marketing strategies accordingly.
- Improve performance: Use data to identify underperforming areas and optimize content and functionality for better results. For instance, if certain blog posts or pages have high bounce rates, you can analyze what’s causing visitors to leave and make improvements like updating the content, enhancing load times, or adding more engaging elements like videos or call-to-actions.
- Understand audience behavior: Gain insights into your visitors’ demographics, interests, and devices, allowing you to create targeted content. With Google Analytics, you can see detailed reports on age groups, locations, and even the technology your audience uses to access your site. This helps you tailor your WordPress site to better suit their needs—for example, optimizing for mobile users or creating region-specific promotions.
- Measure conversion rates: Track how well your site converts visitors into subscribers, customers, or leads. Google Analytics allows you to set up goals to measure key actions, such as form submissions, downloads, or purchases. This data is essential for improving sales funnels and marketing campaigns.
- Monitor site performance over time: With historical data, you can identify trends and patterns in your site’s performance. For example, you can compare traffic and engagement levels month-to-month or year-over-year, helping you spot seasonal trends or measure the impact of specific campaigns.
- Free and easy integration: Google Analytics is completely free and offers extensive insights, making it an invaluable resource for any WordPress site owner. Additionally, WordPress plugins like MonsterInsights or Site Kit by Google make integration seamless, allowing you to view analytics data directly from your WordPress dashboard without any technical expertise.
- Enhance SEO strategies: Use analytics to identify which keywords or landing pages bring the most traffic to your site. This allows you to focus on optimizing content that performs well in search engines while addressing underperforming pages to improve your overall SEO strategy.
Creating a Google Analytics account

source: https://developers.google.com/analytics
To get started with Google Analytics, follow these steps to set up an account and prepare for integration with your WordPress website: Setting up a Google Analytics Property is crucial for effective tracking of your website and mobile apps.
Step 1: sign up for Google Analytics
- Visit the Google Analytics website and click on Start for free.
- Log in with your Google account or create a new one if you don’t already have one.
- Follow the prompts to create your Google Analytics account.
Step 2: provide website details
- Enter basic information about your WordPress site, including:
- Website name (e.g., My WordPress Blog).
- Website URL (e.g., https://www.example.com).
- Industry category (e.g., Retail, Technology, or News).
- Time zone for accurate reporting.
Step 3: receive your tracking ID
- After completing the setup process, you’ll receive a unique tracking ID and a tracking code.
- This ID and code are essential for linking Google Analytics to your WordPress website.
With your Google Analytics account ready, you’re now prepared to integrate it with your WordPress site and start gathering valuable insights.
How to add Google Analytics to WordPress: 3 methods
1. Using a WordPress plugin
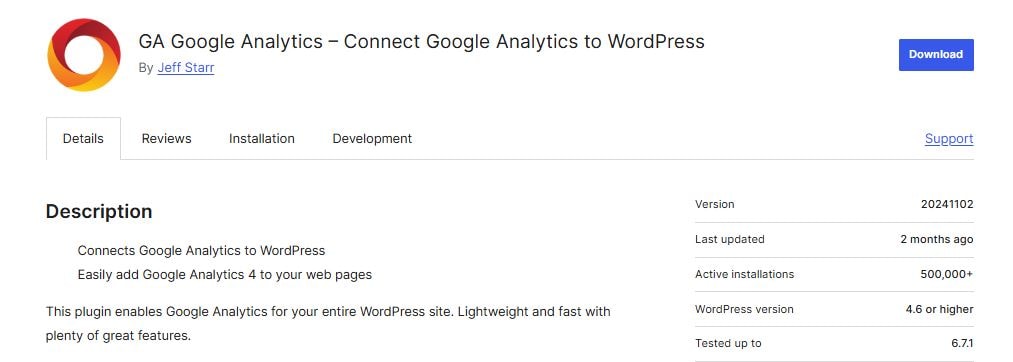
source: https://wordpress.org/plugins/ga-google-analytics/
One of the simplest ways to add Google Analytics to your WordPress site is by using Google Analytics WordPress plugins. This method is particularly user-friendly and doesn’t require any technical expertise, making it ideal for beginners who don’t need tech knowledge to learn how to add Google Analytics to WordPress.
Step 1: Choose a Google Analytics plugin
There are several popular plugins available for integrating Google Analytics, such as MonsterInsights and Google Analytics by 10Web.
These plugins provide a seamless way to connect your Google Analytics account and display data directly in your WordPress dashboard.
Step 2: Install and activate the plugin
- Go to your WordPress dashboard and navigate to Plugins > Add New.
- Search for your chosen Google Analytics plugin (e.g., MonsterInsights).
- Click Install Now, and once installed, click Activate to enable the plugin on your site.
Step 3: Connect your Google Analytics account
- Open the plugin settings from your WordPress dashboard.
- Follow the prompts to authenticate your Google account.
- Enter your Google Analytics tracking ID when prompted, or allow the plugin to connect automatically.
Step 4: Configure the plugin settings
Most plugins allow you to customize what data is tracked, such as user roles, specific pages, or outbound clicks. Review and adjust these settings based on your analytics needs.
2. Adding the Google Analytics tracking code manually
If you prefer not to use a plugin, you can add the Google Analytics code to your WordPress site manually.
This approach requires editing your website’s files but offers a straightforward way to integrate Google Analytics without additional tools. It is important to select the best method to install Google Analytics based on your experience level to ensure accurate traffic data collection.
Step 1: copy your Google Analytics tracking code
- Log in to your Google Analytics account and navigate to the Admin section.
- Under Property Settings, find your unique tracking code.
- Copy the code, ensuring you don’t miss any part of it.
Step 2: access your site’s header.php file
- Log in to your WordPress dashboard and navigate to Appearance > Theme Editor.
- In the Theme Files section, locate and click on the header.php file.
Step 3: paste the tracking code
- Within the header.php file, find the <head> section.
- Paste your Google Analytics tracking code just before the closing </head> tag.
- Save the file by clicking Update File.
Step 4: verify installation
- Return to your Google Analytics account and use the Real-Time report to verify that the tracking code is active.
- Visit your website to generate data and confirm the setup is working correctly.
Manually adding the tracking code gives you full control over its placement and ensures compatibility with your site. However, it’s essential to back up your files before making changes to avoid errors.
3. Using Google Tag Manager
Google Tag Manager is a powerful tool that allows you to manage multiple tracking codes and tags, including the google analytics tag, on your WordPress site.
Using Google Tag Manager provides a centralized way to manage tracking codes, making it easier to update or add new tags in the future.
It’s an excellent solution for those handling multiple analytics tools or looking for advanced customization options. It’s especially useful for advanced users or those running multiple analytics and marketing tools.
Step 1: set up a Google Tag Manager account
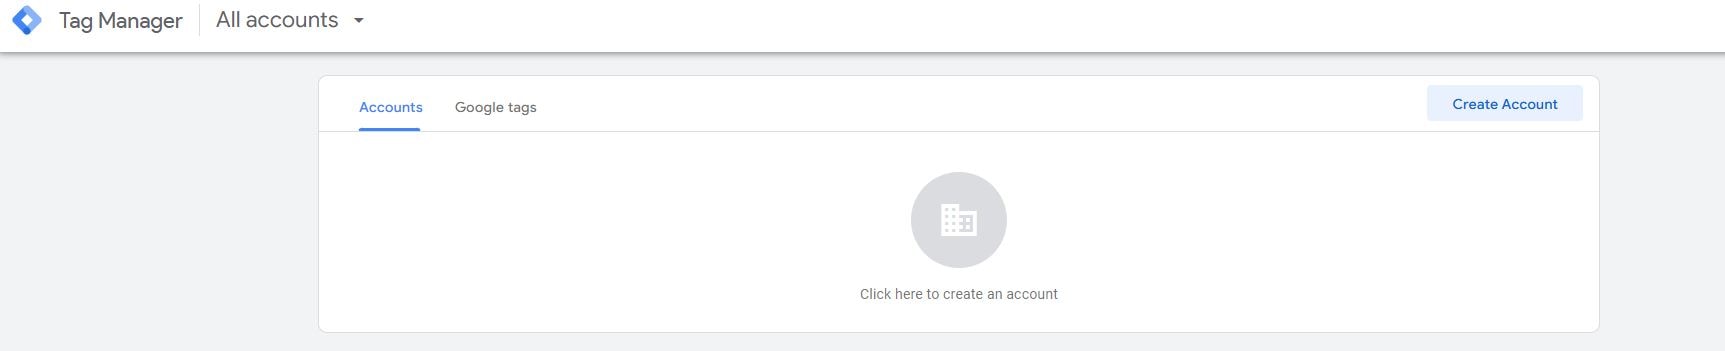
- Visit the Google Tag Manager website and log in with your Google account.
- Create a new account and container for your WordPress site.
- Follow the prompts to complete the setup process and receive your container code.
Step 2: add the container code to your site
- Copy the provided container code snippets.
- Log in to your WordPress dashboard and navigate to Appearance > Theme Editor.
- Paste the first snippet in the <head> section of the header.php file and the second snippet in the <body> section of the footer.php file.
Step 3: create a Google Analytics tag
- Open your Google Tag Manager account and click New Tag.
- Select Google Analytics: Universal Analytics as the tag type.
- Enter your tracking ID and configure the trigger to fire on all pages.
- Save the tag and publish your changes.
Step 4: verify the setup
- Use the Preview mode in Google Tag Manager to test the tag’s functionality.
- Check your Google Analytics account to confirm data is being tracked.
Verifying and viewing Google Analytics data

source: https://developers.google.com/analytics/learn/marketers
Once you’ve successfully added the Google Analytics tracking code to your WordPress site, the next step is to ensure that it’s working correctly by checking the Google Analytics dashboard.
To do this, log in to your Google Analytics account and navigate to the Real-Time reports section. Here, you can monitor live traffic on your site, which is a quick way to verify that data is being tracked accurately.
If you’ve used a plugin like MonsterInsights, you can also view key metrics directly within your WordPress dashboard. This feature makes it easier to track important insights without needing to switch platforms.
However, keep in mind that it can take up to 24 hours for some data to populate fully in your Google Analytics account.
During this time, make sure to explore the various reporting options available to familiarize yourself with the data you’ll be analyzing.
Key metrics WordPress site owners should track with Google Analytics
source: https://www.semrush.com/blog/metrics-in-google-analytics/
Tracking the right metrics in Google Analytics helps WordPress site owners understand their audience, improve performance, and achieve business goals.
By monitoring key metrics, WordPress site owners can gain actionable insights to optimize their website’s performance, improve user experience, and achieve business objectives. Google Analytics provides the data you need to make informed decisions and grow your online presence effectively.
Here are the essential metrics to monitor, along with explanations and how to track them.
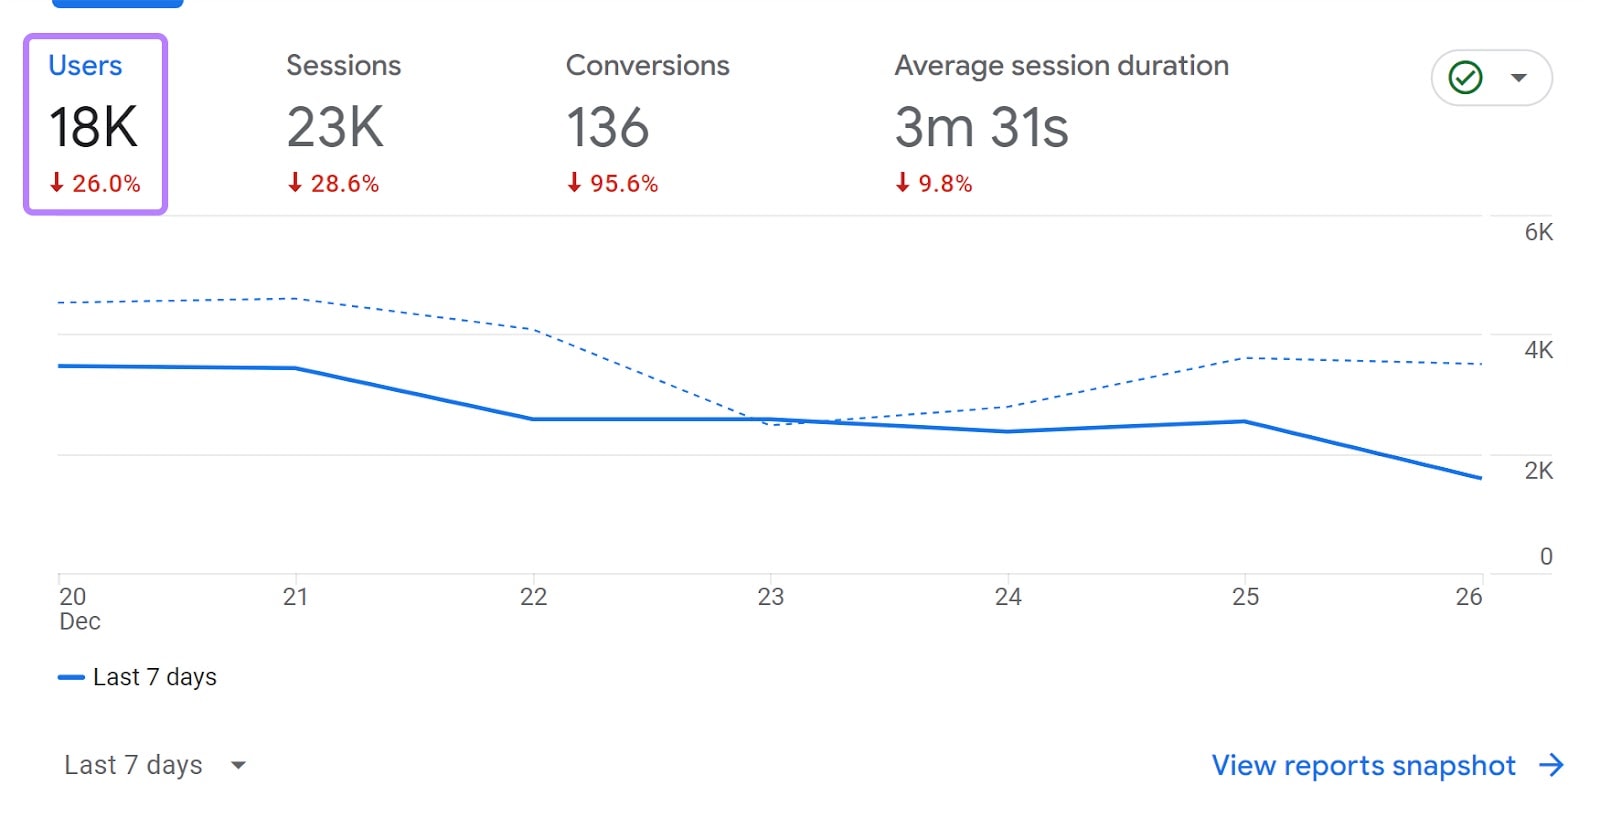
1. Users and sessions
Users represent the number of unique visitors to your website, while sessions indicate the total number of visits, including repeat visits by the same users.
For example, if one person visits your site three times in a day, this counts as one user and three sessions. This distinction helps you understand both the size of your audience and how often they engage with your content.
To track these metrics, navigate to Reports > Acquisition > Overview in Google Analytics.
From there, you can view trends in users and sessions over time, which can help evaluate the effectiveness of your marketing efforts.
A steady increase in users indicates successful strategies, such as improved SEO or social media campaigns.
2. Bounce rate
Bounce rate measures the percentage of visitors who leave your site after briefly viewing just one page, without interacting further.
This metric is a key indicator of user engagement and content relevance.

A visitor who lands on a blog post but doesn’t click on any links or visit other pages contributes to a higher bounce rate. A high bounce rate may signal that your content isn’t meeting user expectations, your call-to-action (CTA) is unclear, or your site design needs improvement. Addressing these issues can lower bounce rates and increase user retention.
You can find bounce rate data under Reports > Behavior > Site Content > All Pages in Google Analytics.
3. Average session duration
Average session duration reflects the average time users spend on your website during a session.
This metric helps you gauge how engaging your site is. If visitors are leaving after just a few seconds, it could indicate issues such as slow page load times, irrelevant content, or poor navigation.
Longer session durations generally indicate that users find your content valuable and are exploring multiple pages. If session duration is low, consider optimizing your content, improving readability, or adding multimedia elements like videos to encourage users to stay longer.
To monitor this metric, go to Reports > Audience > Overview in Google Analytics.
4. Pages per session
Pages per session measures the average number of pages a visitor views during a single session.
This metric reveals how well your website encourages users to explore beyond their entry point. For example, if a visitor lands on your homepage and then clicks through to a blog post, a product page, and a contact form, that session would count as four pages.
Higher numbers indicate that your website has strong internal linking and engaging navigation, encouraging users to browse more.
To improve this metric, focus on creating clear navigation menus, including related content links, and using CTAs to guide users to other sections of your site.
You can track this metric under Reports > Audience > Overview.
5. Traffic sources
Traffic sources show where your website visitors are coming from.
These sources include organic search, social media platforms, referral links from other websites, and direct traffic (users typing your URL directly into their browser).
Understanding these sources helps you identify which channels drive the most traffic and where you should focus your marketing efforts. For example, if you notice most of your traffic comes from social media, you might want to allocate more resources to social media campaigns.
Conversely, low organic search traffic might prompt you to optimize your site’s SEO.
To view traffic sources, navigate to Reports > Acquisition > Traffic Channels in Google Analytics.
6. Conversion rate
Conversion rate measures the percentage of visitors who complete a specific goal, such as signing up for a newsletter, filling out a form, or making a purchase. This is one of the most critical metrics for evaluating how effectively your site turns visitors into customers or leads.
Monitoring your conversion rate helps identify bottlenecks in your marketing funnel. For instance, if your product pages get traffic but few sales, you may need to improve your product descriptions, pricing, or checkout process.
To track conversions, you need to set up goals in Google Analytics by navigating to Admin > Goals and defining actions such as completing a checkout process or submitting a contact form.
Troubleshooting and best practices
If Google Analytics isn’t working on your WordPress site, the first step is to double-check the tracking code or plugin settings. Ensure that you’ve entered the correct tracking ID and placed the code in the appropriate location, such as the < head> section for manual integration.
Accessing Google Analytics reports is crucial for analyzing data effectively and gaining insights into website performance and visitor behavior.
Testing your tracking setup regularly is also important to confirm that everything is functioning as expected.
To optimize your use of Google Analytics, update your tracking code whenever Google releases a new version.
Outdated code can lead to inaccurate data and missed insights. Additionally, use the data from Google Analytics to inform your website’s strategy, whether it’s improving user experience, enhancing content, or optimizing conversions.
Following these best practices will ensure that your analytics setup remains accurate and valuable for your website’s growth.
Advanced Google Analytics features for WordPress
Installing Google Analytics on your WordPress site unlocks a range of advanced features that provide deeper insights into your website data, visitor behavior, and overall performance. These features allow WordPress site owners to analyze how visitors interact with their content, optimize their website’s functionality, and make data-driven improvements.
Let’s explore these advanced features and how they work in detail:
1. Event tracking. Event tracking in Google Analytics allows you to monitor specific user interactions, such as button clicks, form submissions, video plays, or file downloads. Unlike tracking basic page views, event tracking helps measure actions that don’t trigger a new page load.
- How it works: Set up event tracking by configuring a Google Analytics tag in Google Tag Manager or using the tracking ID in your WordPress site. You’ll need to define event parameters like category (e.g., “Video”), action (e.g., “Play”), and label (e.g., “Promo Video”). If you’ve successfully installed Google Analytics or used the Site Kit plugin, this process becomes even easier.
- Why it’s useful: By monitoring specific events, you gain a better understanding of how visitors interact with your site, such as which CTAs lead to conversions. For instance, track form submissions on a contact page to analyze user engagement and improve conversion rates.
2. Goals and conversions. Goals in Google Analytics are designed to measure how well your site fulfills specific objectives, such as completing a purchase, signing up for a newsletter, or spending a certain amount of time on a page. A conversion is recorded each time a user completes one of these predefined actions.
- How it works: Goals are configured within your Google Analytics account by navigating to the property setup screen and defining specific criteria like a destination URL (e.g., a “Thank You” page) or an event. If you’re using a Google Analytics WordPress plugin, it may help automate goal setup.
- Why it’s useful: Goals and conversions are essential for tracking the success of marketing campaigns or e-commerce initiatives. For example, understanding the steps users take to reach a checkout page can help you identify and fix bottlenecks in your sales funnel.
3. E-Commerce tracking. Enhanced e-commerce tracking in Google Analytics lets you monitor sales, revenue, shopping behavior, and abandoned carts on your WordPress website. This feature provides comprehensive reports about how users interact with your product pages and checkout process.
- How it works: Use a Google Analytics plugin like Site Kit or MonsterInsights to integrate Google Analytics with your e-commerce platform, such as WooCommerce. Once integrated, Google Analytics collects data like product performance, transaction details, and shopping behavior.
- Why it’s useful: E-commerce tracking allows you to identify your top-selling products, monitor average order values, and determine where customers drop off in the checkout process. By analyzing this data, you can refine your e-commerce strategy and increase sales.
4. Custom reports and dashboards. Custom reports and dashboards in the Google Analytics dashboard allow you to tailor data views to focus on the metrics most important to you. Rather than sifting through default Google Analytics reports, you can create a personalized analytics dashboard to monitor your KPIs.
- How it works: Access the Google Analytics dashboard and use the customization options to select dimensions (e.g., user location) and metrics (e.g., sessions). Widgets can be added to dashboards to display analytics data like website traffic or conversion rates in a single view.
- Why it’s useful: Custom dashboards save time by centralizing essential data. For example, a dashboard showing traffic sources, user behavior, and sales performance provides a quick snapshot of your website’s health.
5. Audience segmentation. Audience segmentation divides your visitors into groups based on criteria like demographics, traffic sources, or user behavior. This helps you analyze and understand specific audience groups more effectively.
- How it works: Use the Google Analytics audience report to create segments for groups like mobile users, organic traffic visitors, or customers who completed a goal. These segments can be applied to Google Analytics data for deeper analysis.
- Why it’s useful: By segmenting your audience, you can refine your strategies to target specific groups. For example, if organic search visitors have a high bounce rate, you might improve your SEO or optimize landing pages to better meet their needs.
6. Real-time analytics. Real-time analytics shows live data about user activity on your website. This feature allows you to monitor current traffic, visitor location, and active pages as they happen.
- How it works: Navigate to the Real-Time section in the Google Analytics dashboard. You’ll see data streams of user behavior, including the number of active users, top pages being viewed, and traffic sources driving visitors to your site.
- Why it’s useful: Real-time analytics is particularly useful for monitoring the immediate impact of campaigns or announcements. For example, if you launch a new blog post or email campaign, you can watch live traffic trends and adjust your strategy if needed.
Conclusion
Google Analytics integration is an indispensable tool for WordPress site owners, offering invaluable insights into user behavior, traffic sources, and overall site performance.
By tracking key metrics like users, sessions, bounce rate, and conversion rates, you can make data-driven decisions to optimize your content, improve user engagement, and drive conversions.
Understanding these metrics not only enhances your website’s functionality but also helps you achieve your broader business goals, whether it’s growing your audience or increasing sales — with the right Google Analytics settings applied.
Ready to simplify your website management?

With StriveCalendar.com, you can stay organized by scheduling key tasks like reviewing your Google Analytics data and making updates to improve site performance.

Take control of your WordPress site with ease—start using Strive Calendar today and keep your site running smoothly and efficiently!